
Feature Article
Installing a Vapor Barrier in a Sealed Crawlspace
To avoid moisture and mold problems, isolate the crawlspace framing from the soil with a heavy-duty vapor barrier
By: Matt Leech
Crawlspaces offer all of the headaches of a basement and none of the
benefits. Moisture can enter the crawlspace as either liquid water,
usually caused by poor surface drainage around the foundation, or as
water vapor from the soil. When it isn’t actually forming puddles,
this moisture can condense on cooler surfaces—such as floor joists and
subflooring—where it can promote mold growth and rot. Adding vents to
introduce fresh air can work when the air is dry and not too warm or
cold, but it often backfires and exacerbates the problem by either
adding moisture from humid air, as is the case in hot, humid climates,
or cooling the crawlspace air, which promotes condensation on wood
framing.
Whether or not a crawlspace is vented, the floor and foundation should be isolated from the framing. What follows is a step-by-step look at how to properly retrofit an existing crawlspace with a continuous vapor barrier sealed at the seams and edges.
Apply Tape to the Foundation

Seal the vapor barrier to the foundation with double-sided Foundation Seal Tape (see Source of Supply, page 22). Keep the tape about 3 inches down from the top of the wall to leave a termite inspection gap (1). The tape bonds well to block and concrete, but only if the wall surface is free of dust, insulation fibers, and other contaminants. To remove any loose particles, use a soft brush, not a wire brush—especially on a block wall; a wire brush creates dust that fills the pores in the block and makes it difficult for the tape to adhere.
Press the tape into place along the top of the foundation wall, leaving the paper backing in place. When the perimeter is completely taped, peel off just enough of the paper facing to expose the tape in the first section of wall you plan to cover (2). Don’t peel off too much at one time; on long walls, you can peel off the paper as you go.
Press the vapor barrier material—we’re using DiamondBack here—into the sealing tape, being careful to keep it level and flat. This work can be done solo, but it’s much easier with two people. Foundation Seal Tape will temporarily hold the plastic sheeting in place until you install mechanical fasteners.
Fasten the Vapor Barrier
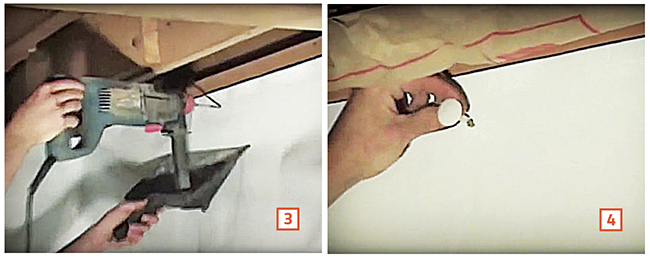
With the first section of vapor barrier properly positioned and stuck
to the tape, drill holes through the plastic into the block about 2
feet on center (3).
Drilling through the tape will prevent the plastic from peeling off
when you remove the drill. At inside corners, drill a hole on both
sides to relieve tension at the corner and help maintain the tape
seal. It’s a good idea to use a dust pan to catch larger pieces of
concrete. Otherwise it creates a mess on the sheeting that’s annoying
to work in and may also cause punctures.
Use plastic Foundation Pins to carry the weight of the vapor barrier.
These pins are held in place by compression and must be lightly
hammered into the pre-drilled holes (4). Properly
installed, they will take the load off the tape and will permanently
hold the plastic in place.
Working Around Obstacles
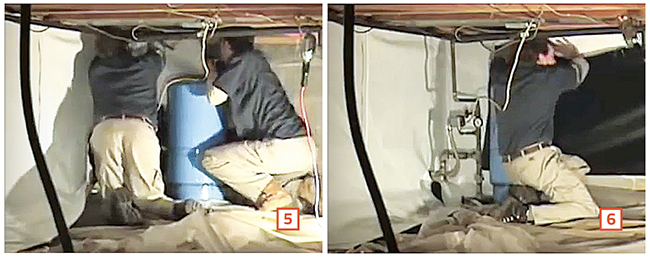
Water heaters, pressure tanks, and other equipment often located in
the crawlspace present an impediment to maintaining a continuous vapor
barrier. In some cases, they may have to be temporarily disconnected,
but typically two people can work together to lift them enough to
allow the plastic sheeting to be slipped underneath.
In the project shown here, three pieces of DiamondBack sheeting were
used to handle both the corner and the area under the pressure tank.
The wall piece on one side of the corner folds onto the floor and
around the corner about a foot (5). The wall piece on
the other side of the corner is longer so that it can run under and a
bit beyond the bladder tank. The piece on the floor overlaps the wall
pieces, and the seams are taped.
The trick to fastening the plastic to the seal tape while working in
the tight space behind the pressure tank is to fold the material in
half (bottom folded up to the top) (6). When it’s
time to unfold the plastic and slide it under the tank, it takes some
maneuvering to get the tank to the right spot because the vapor
barrier material tends to bunch up behind it
(7).
Make sure you have enough people on hand and take the time to get it exactly where it needs to be. If you have to come back later to reposition it, you may create wrinkles or cause fasteners to pop.
Dealing With Penetrations
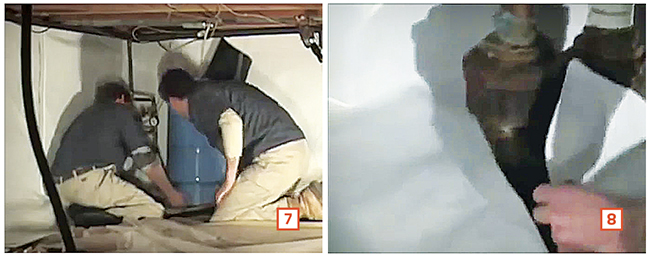
Inevitably, you will run into a sewer or water line coming up out of the floor. In the case of a sewer line like the one shown here, trim the bottom of the wall plastic in a circular shape halfway around the sewer line (8). Lay the remaining flap against the sewer line and trim it to fit as close to the pipe as you can. Use Waterproof Seam Tape to seal the seam and to seal the edges of the plastic to the sewer line itself.
Cover the Floor
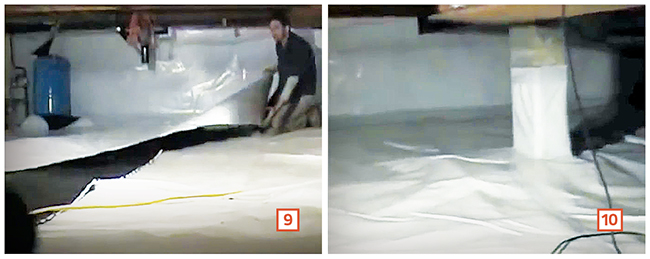
With all of the wall material sealed and fastened in place, it’s time
to cover the remainder of the floor. First, take off your work boots
so as not to damage the vapor barrier. Then make sure that any cables
or phone lines are on top of the vapor barrier (9).
This minimizes penetrations, makes these lines easy to access later
for service, and keeps them warm and dry on top of the vapor barrier
rather than cold and wet underneath it.
Wrap support posts about 2 feet up and overlap the floor layer on the base of the support plastic (10). After checking that all seams in the vapor barrier are sealed, call it a day.
Matt Leech is a former a crawlspace contractor with experience in a variety of climates nationwide. He owns and operates CrawlSpaceRepair.com, where he refines installation methods and develops and supplies encapsulation products. This article is adapted with permission from one of many instructional videos at CrawlSpaceRepair.com.
This article was originally published in Professional Remodeler 2017.