
Feature Article
Flashing the Brick-to-Roof Connection
Combine step flashing on the roof with through-wall flashing at the masonry
By: Dan Morrison and Sal Alfano
Flashing the connection where a shingled roof and a brick wall meet is complicated. It takes coordination between the masons and roofers, and it requires lots of custom-fabricated metal flashing with soldered joints. Here’s a walk-through of the process adapted from an animation at ProTradeCraft.com. The details are based on the extensive library of SketchUp models at the International Masonry Institute. Technical assistance was provided by Harrison McCampbell, AIA, and by Doug Horgan, who shared best practices he has documented for production managers at BOWA, a northern-Virginia design-build company.
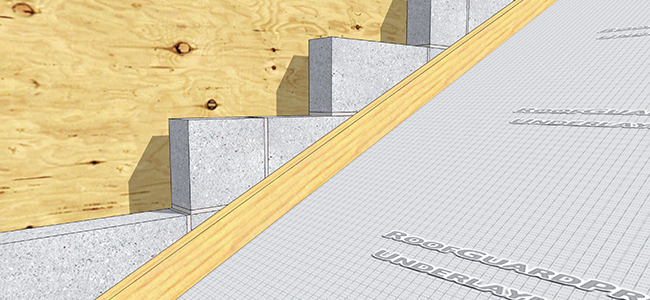
Make sure the inside corners of the supporting masonry are at least 4
inches above the roof deck. This leaves enough room for the vertical
leg of the step flashing. A 2x4 laid on the roof is a good way to
gauge this.
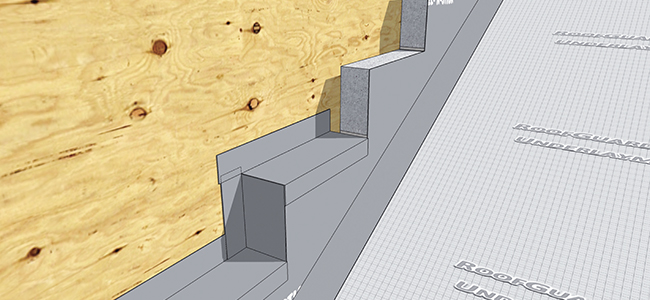
Starting at the lowest part of the roof, completely cover all three
exposed surfaces of the block with peel-and-stick membrane. This
protects against leaks until the rest of the assembly is in place.
Doug Horgan recommends asking the masons to handle this step because
masons typically have the right material on site. Step by step: 1) Run
membrane down the side of the block and onto the roof underlayment; 2)
Fold a vertical strip into the inside corner, extending it above the
top of the block so that the next layer of flashing will cover it,
shingle-style; and 3) Cap the block with membrane, overlapping the
first two pieces and bridging the gap between the block and the wall
sheathing. Keep doing this until you run out of stepped blocks.
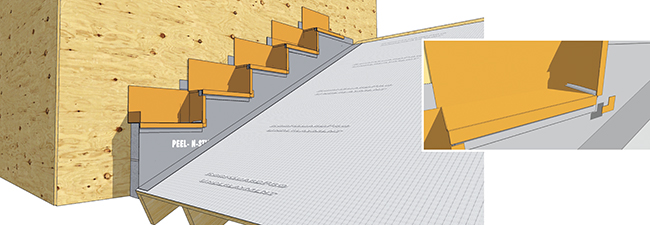
Next, add one-piece, metal pan flashing to each step in the masonry. Any seams that are not folded should be soldered to ensure they are watertight. The bottommost pan should incorporate a turned-up edge to serve as kick-out flashing that dumps water onto the roof. (The roofing should have its own kick-out flashing to direct runoff away from the building or into a gutter.) On subsequent pans, this downhill edge of the pan folds down over the previous pan as counterflashing. The two roof-side edges also fold over the membrane to counterflash the roof step flashing. The long edge is hemmed back toward the block, where it will eventually interlock with a hem on the counterflashing (described below). At the bottom corner of each pan, solder an L-shape piece to the folded edges (inset).
Complete the Masonry, Then the Roofing
At this point in the process, it usually makes sense to complete the masonry work before installing roofing and step flashing. This minimizes damage to the roof and makes it easier to work with staging. To make the wall watertight, make sure the housewrap overlaps all of the metal and membrane against the wall sheathing. The masons should add a bond break layer to keep mortar droppings from creating dams behind the brick. Most important, make sure weep vents are included in the mortar at each pan—without a way for water to escape, all the fancy flashing is for nothing.
Once the roofing and step flashing are in place, complete the counterflashing at the masonry, as follows:
Install metal counterflashing onto the face of the block, extending it
down to about ¼ inch above the shingles. Hook a hem at the top into
the hem in the edge of the pan flashing (inset).
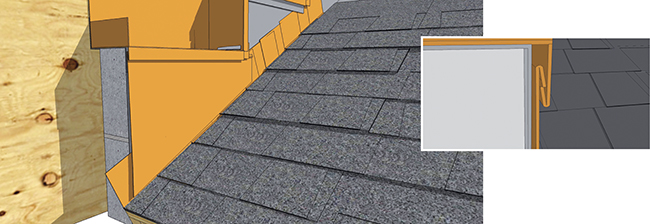
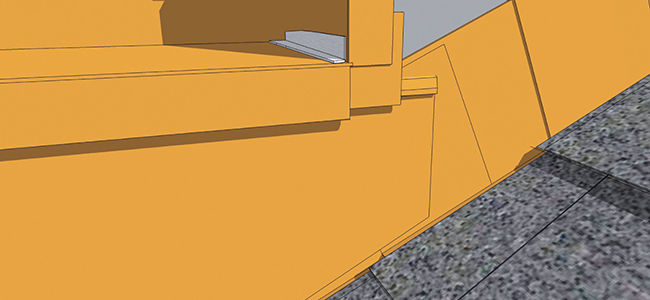
The uphill side of the counterflashing should extend about 2 inches past the corner patch in the pan, where it will be locked into place with the next piece of counterflashing. Keep doing this until you run out of steps.
This article was originally published in Professional Remodeler 2017.